
 Administrator
Google Webmaster Tools - In recent weeks I have set up Google Webmaster Tools for a number of different clients, some of whom wanted some documentation on how this could be done.
Based on that document I have decided to publish this very basic beginner’s guide for those who are unfamiliar with the set up process of Google Webmaster Tools.
What is Google Webmaster Tools?
Google Webmaster Tools (GWT) is a free and easy way for webmasters to view their own website the way that Google sees it. GWT is a free tool that can be used for websites of all sizes, and features information such as:
- Which of your pages are included in Google’s Index
- Any errors encountered while crawling your site
- Search queries that list your site as a result
- Which sites link to yours
- And more
This guide covers how to set up GWT in seven easy steps, from creating an account to adding and deleting users and associating your Google Analytics.
Step 1 – Google Account
To set up Google Webmaster Tools you will need to register for a Google account. If you have access to any of their other products such as Analytics, Gmail or Google Places then you will already have an account.
If you don’t have an account, you can associate your work email address with a Google account to take advantage of their products by clicking here.
Step 2 – Register for Google Webmaster Tools
Visit Google Webmaster Tools, and register for a Google Webmaster Tools Account, and sign in.
Step 3 – Add Website URL
Once signed in, you’ll be able to add your website address by clicking on the “Add a Site” button, typing the address and clicking “Continue”. When entering your domain, you can either add the top level domain (www.example.com) or you are able to add folders if you would like to target a specific area of the site. This is particularly useful if your site is split into regions or country codes and to target different international markets (www.example.com/folder1/folder2/).

Once you have clicked “Continue”, you will automatically be taken to the verification screen to choose your verification method.
Step 4 – Verify Website
GWT provides you with four different methods of validating your website, including uploading an HTML to the root server, adding a meta tag to the homepage, linking to Google Analytics and using DNS. Choose the one that is most suitable to your needs.
Upload HTML File to Server
GWT can provide you with a blank HTML file with a specific code attached to it that associates with your account. You can easily download this by clicking the link “this HTML verification file”. Once you have downloaded this file, you need to upload it directly to the root file of your server then click “Verify” to confirm the placement has been made. Once verification has been made, you will start to see some data population and you can move on to step 6.

If you need to verify at a later date then you can move on to Step 5 when you are ready to verify the account.
Add a Meta Tag
GWT provides you with a meta tag that needs to be added to the <head> tag as an alternative method to adding the HTML file to the website. This meta tag just needs to be copied from GWT (shown below) and added to the homepage of the chosen website. Once this has been implemented, click the “Verify” button to start catching data (move to step 6). If you are not in a position to verify the account, click “Not Now” and come back to Step 5 when you are ready.

Link to Google Analytics Account
GWT provides you with an easier way of verifying your site if you use Google Analytics through the same Google Account that you have set up. If you are using two different accounts, for GWT and Google Analytics, then this option will not work. Ocimnet recommend that you use the same account for all Google products and if it’s a business account, create a central account for the entire business. To verify the Google Analytics account, click “Verify”. Once verified move on to Step 6.

Add DNS Records to your Domain
This option is for those who can sign in to a domain registrar or hosting provider and add a new DNS record. When you choose from the drop down menu (as indicated below), GWT provides instructions. After following the instructions, you need to verify that this has been completed correctly by clicking the “Verify” button. If this works, move on to Step 6; otherwise repeat the instructions or choose another method of verification.

Step 5 – How to Verify Once Method has been Implemented
If you were unable to verify at the time of setting up GWT, then you can verify it at a later date. When logging in to GWT, you will be presented with the websites that you have set up and a link to “Verify the Site” underneath the Manage heading. Click the “Verify this Site” link.

You will be presented with a similar screen as discussed in Step 4, where you need to choose your validation method. The validation method that you choose on this occasion needs to be the same as what you had originally chosen when setting up GWT.
Example: If you had originally chosen to add a HTML file to the root, then you need to reselect the HTML file verification.
Step 6 – Manage Users
GWT allows the administrator of the account to provide access to multiple users by adding them to the Verification Details via the “Manage” link as you log in to the tool.

Once you have clicked the “Manage” link, you will be directed through to the Verification Details page, where you will be allowed to add/edit/delete the users who have access to the data via their own Google account.
Step 7 – Associate Google Webmaster Tools with Google Analytics
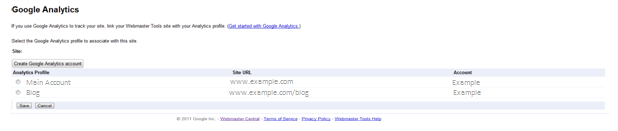
If you use Google Analytics to track your website, then GWT allows you to import some data into the Google Webmaster Tools interface to add extra value to your data. This option will only be available if your Google Analytics account is associated with the same account that GWT is set up on. To add Google Analytics to your profile, click “Manage” and select “Google Analytics Profile”.

After you select “Google Analytics Profile”, you will be redirected to the Google Analytics page within GWT, where you can select the Google Analytics account/profile that is relevant to the website. Using the tick box, select the profile relevant to your account and click the save button; this will begin to insert data direct from your analytics account. If you haven’t got Google Analytics but would like to create an account, click “Create Google Analytics Account”.
So if you followed all the steps correctly you should now have fully installed Google Webmaster Tools account that will have data about your website populating the dashboards soon.
I hope you found the Google Webmaster Tools: A Beginner’s Guide to Installation useful. If you have any comments on the guide I have provided or on Google Webmaster Tools in general I would love to hear from you.


